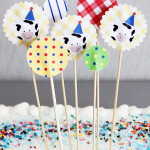
At Levi’s second birthday party on Sunday I served a simple Costco sheet cake. Although it was delicious, I’ll be the first to admit that it wasn’t terribly creative — especially compared to other second birthday cakes I’ve recently seen. Ashley and Aron baked Hudson a firetruck birthday cake, and my friend Shira baked her daughter a polka dot birthday cake!
Shira’s polka dot cake was so impressive that I had to ask her how she did it. Lucky for us, she was happy to share her inspiration and step-by-step instructions:
(photo by Once Upon A Pedestal)
“My daughter, Naama, loves bubbles, so my original idea was to make a bubble cake. When I searched for “bubble cake” on Pinterest, I came across this pin and instantly knew I had to try it! (In fact, it wasn’t until I found that cake that I actually decided to invite people over for a party! Before that we were kind of on the fence about having a second birthday party.)
I made the cake using this recipe, but I adapted it to make it parve (dairy free), as all my baking pans are parve. I would’ve used a cake mix like I did last year for Naama’s first birthday cake, but I could only find a parve yellow cake mix, not a white one. I thought this polka dot cake really needed white cake, so I made it from scratch.
I made the dots first using my adapted recipe for the parve white cake and baking them in a cake pops pan. I knew I wanted six different colors for the dots, so I divided up the batter into six small bowls and added a bit of Wilton Gel Food Coloring.
(I used regular food coloring last year for the purple cake, and although I felt like I needed to use a LOT, the colors didn’t turn out that vibrant. The gel worked so much better and created much brighter colors!)
I baked the cake pops for half the recommended time — until they were just formed but not cooked through. Then I let them cool completely. They were a little funny looking when they came right out of the pan; there was a volcano top and a ring around the middle where the two sides of the pan met. I simply trimmed off the excess to make nice little dots.
Next I made a second batch of white cake batter and layered a small amount in three pans. To make one cake big enough for the whole party, I used three nine-inch round pans (the original recipe called for six-inch round pans). I placed nine cake balls in each of the three pans, trying to stagger the colors, although I wasn’t too concerned because I knew any pattern would be fun! Then I covered the pops with the remaining batter and hoped it would bake up around the dots.
(photos by This Little Life of Mine)
When the pans came out of the oven, I finished the cake like I would’ve any other, frosting each layer and then frosting the three tiers together. I used canned frosting because a) it’s delicious! and b) I wanted it to be really white so that the colorful polka dots really popped. The “2” created from sprinkles was also a Pinterest find.
I was so nervous to cut the cake at Naama’s birthday party because I wasn’t entirely sure how the polka dots would come out. But it turned out perfectly, and Naama’s face when she saw the cake and candles made it totally worth it. She was so super excited!”
P.S. - The beautiful purple ombre cake that Shira baked for Naama’s first birthday last year!


Erin O'Brien
What a super fun cake! Thank you for bringing the baker on to share some tips. I can’t wait to have kids, as then I’ll have even more of an excuse to bake more creative, colorful confections. 🙂